Female Sintra Darts TutorialLead Author: Kuu
Edited by: MMCC Education Team
This is a tutorial that describes how these two Legacy armor breastplates were created, for ladies that have anatomy that requires the build materials to yield very compound curves.
The Finished Kits The Yellow Armor (Maelie) --raw sintra
  The Silver Armor (Jaelie) -- raw sintra
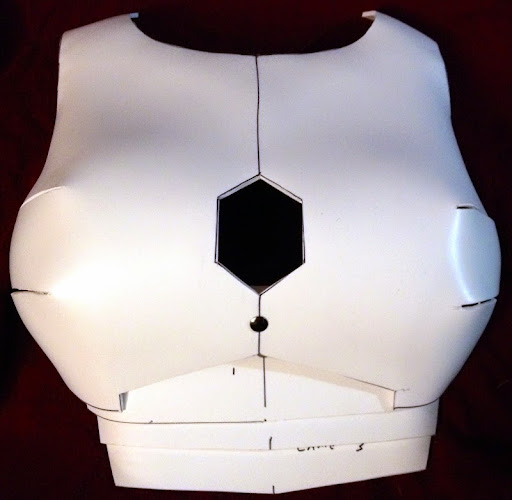
Create/Customize PatternPattern Diagram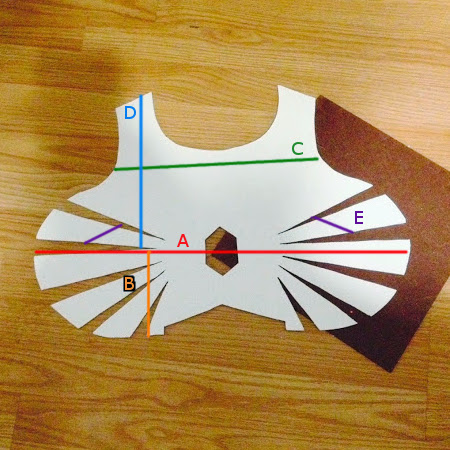
Tools Needed for this Section
- Your undergarments, and armor vest
- Pen or Permanent Marker
- Masking Tape
- Poster Board
- Measuring Tape
Steps for Method 1Put on all your supporting garments and vest.
Measurement A is across the point of the bust and goes back towards the armpit however far as you want the armor plus about 1 inch for slop (In the end about that much was cut off to even everything up)
Measurement B is from the "A" line (point of bust) down to wherever you want the bottom to be. In Maelie's case it was basically back to the ribcage. Don't curve "up" (i.e. that place from whence boobsweat originates, the area under your breast/up against your ribcage - it's not a bra or bikini) with your measuring tape, if anything curve down to go with the flow of the armor plate (when you're done the goal is a graceful-ish line from your chest into your belly plates). No need to add anything to the measurement here.
Measurement C is across the top of the main breast mass, armpit to armpit. No need to add any extra inches here as you'll be sanding/cutting away anyway.
Measurement D is from top of shoulder (wherever you want the top of the armor to be) down to point of bust.
Then just kinda draw a freehand curvy line to connect those points. You only need to makee half the pattern (i.e. the center is a straight vertical line), then flip it and trac it again to make the armor itself.
Then go in and draw triangular "darts" - just eyeball it - the point of the triangle should be just on the other side of the point of your bust (i.e. closer to your sternum than armpit)
The Purple E - is just where it was discovered that, after forming the other "fingers" (as Maelie called them) the had to be cut basically to a nub to get it to fit. If you make a pattern half, divide all the horizontal measurements (A & C) in half. If you don't want to do math, do the full thing.
Steps for Method 2Put on all your supporting garments and vest.
Use masking tape to cover 1/2 of your torso area where you will want the breastplate to be
Taped Torso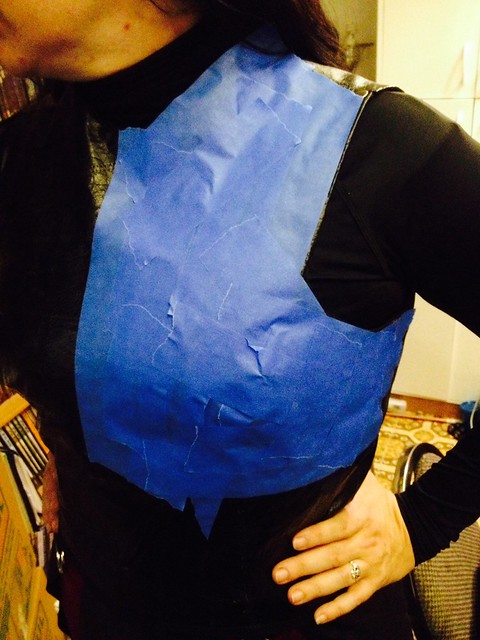
Use a marker to draw a centerline, and then trace the outer line of your desired armor.
Go in and mark where the darts will be with a single line.
Plate Pattern
Remove masking tape carefully.
Cut "dart" lines and lay the pattern flat on posterboard or scrap paper.
Raw Template
Widen your darts by a few milimeters (if using 3mm sintra, add 1-2 mm to the dart width).
Adjusted for 3mm Sintra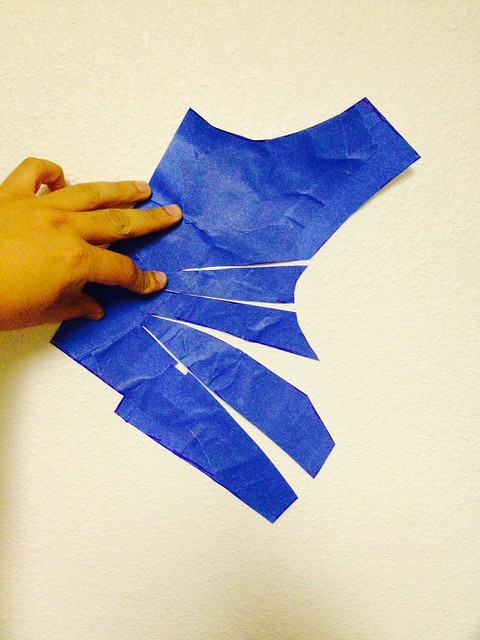
Redraw the pattern on poster-board (smoothing out your lines/cleaning up).
Cut OutTools Needed for this Section
- 3mm Sintra (or whatever you're using)
- Pen or Permanent Marker
- Something to cut whatever you're using
Template from step 1 or 2, doubled, and cut out of posterboard

Take your pattern and trace it on to the Sintra (3mm is much easier to work with for this application than 6mm).
if you did a half pattern, Flip on the vertical line and draw the other half. Doing it this way makes it more symmetrical.
Cut out your Sintra however you prefer and sand the edges lightly. Here, a band saw was used for everything except the center diamond, for that a hobby knife was used (just go over your lines several times, pushing lightly and it'll come out. The Sintra is soft)
Positive Forms
Positive forms are dome/bowl shapes that roughly match the curve you're trying to achieve with the Sintra. You could also use full spehers.
In this case, fillable Christmas Ornaments were used as positive forms. Take a ruler to your most comfortable Underwire Bra and get a ballpark diameter of the wire itself, this is the diameter ball that you'll need.
For Maelie we used a 120mm ornament (she wears a 34G US/34H UK), for Jaelie 100mm (34E US/34F UK). It can be small by an inch or more as the "mono-boob" (aka "sports bra") style will give you some flex with your measurements. Get close, but don't stress it if it's not exactly the same size as your underwire.
Assorted Sizes
http://www.amazon.com/Clear-Plastic-Fillable-Ornaments-Sizes/dp/B0081Y8HAWNOTE: Depending on how hot you like to get your Sintra, you may want to reinforce your positive mold. The colder you prefer to leave your Sintra, the stronger you'll need the form to be. You can pour Plaster of Paris into one . If you are willing to use hotter Sintra (and wear a glove or whatever) you won't need this kind of reinforcement. If you use 6mm Sintra, reinforce your spheres.
Basic Forming of The "Fingers" (between the darts) using Heat GunTools Needed For This Section:
- Heat Gun
- Gloves
- Your positive form
- Your cut out armor
- Your clothing on. You'll need to put the Sintra up to your body from time to time to check and it can still be uncomfortably warm.
Positive forms and Armor
Imagine each of these ornament halves flat side down on a table. This picture just gives you a general idea of how it'll look.
Heat up a single triangular "Finger" section (from the bottom, up to the armpit)
Form it over your positive form. Push down on all the corners and whatnot to try and get as smooth as shape as you can.
Repeat for all "Fingers" going around the spherical positive form.
When all your Darts are finished, form your shoulders and the rest of the breastplate as best you can. The example used a straight plane down to the point of bust, but it's up to you really.
Fine Tuning Using SpacersTools Needed For This Section
- Superglue
- Little snips and scraps of Sintra
- Masking tape
- A friend you trust.
Sintra darts with spacers
You will notice that the individual "fingers" formed by the curved darts are springy and will not hold to your individual shape.
Get a friend you like well enough to let them be near your chest (very up close and personal operation this... you can do it yourself, but it's harder).
Cut small rectangles of Sintra.
You'll need to insert those Sintra "spacers" in and around the edges of the "fingers" until the structure starts to stabilize. Use tape to hold them down.
When all the spacers are in, use a drop of superglue to "lock" each one in place.
The breastplate is starting to get rigid now/less springy.
Fiberglass and ResinTools Needed For This Section
- Fiberglass Resin and Resin Hardening Drops (i.e. found in a Bondo Repair Kit or can be purchased separately)
- Scissors
- Cheap crappy paintbrush you're okay with destroying
- Plastic cup you're going to throw away afterwards
Armor with fiberglass matting
Purchase a Bondo automotive repair kit, or fiberglass and resin.
Cut long strips of fiberglass the width of your gaps.
Put a single drop of superglue somewhere on the Sintra and "lock" the strip of Fiberglass in place. You just need it to not float around until you can pour the resin.
Mix up the Resin (I've found you don't need to be all that precise with ratios.... just remember, the more Drops of Hardener, the faster you need to work
Slather the resin onto your Fiberglass strips with the old paintbrush. You don't need to be precise, just slather it on there and get a good coating in place.
NOTE - Optionally you can follow the Bondo directions (mix resin, dip strip of fiberglass in resin, put strip in place) but I found it was very messy and wasted a tremendous amount of resin.
Now go away for an hour or two. Even better come back tomorrow. No really.
After the resin cures, it'll look a bit like this. 
If you've got pokey bits on the inside (maybe the superglue hardened the fiberglass into a sharp pokey bit) just cut them off with a razor blade. If it's still pokey you can cover all this with Duct Tape when you're done, or you can sand them down.
BondoTools Needed For This Section
- Something to mix the Bondo on (Silicone cookie sheet, foil, whatever) - a big flat surface is best.
- 1 1/2" wide paint scraper (metal blade is best)
- Something to scoop Bondo with (plastic spoon is fine... don't touch raw Bondo with anything else. It'll contaminate it and cause it to harden prematurely. Only scoop bondo with this spoon.)
- Bondo "Body Filler" (not Putty or whatever else, basic red label Bondo Body Filler) and Red Cream Hardening Paste (both come in a Bondo Repair kit or can be purchased separately)
- Good air circulation, respirator recommended.. or do this outside. Outside, with a respirator, is even better
Outside of armor after Bondo
Scoop out the raw Bondo and drop it on your mixing surface (flat is best)
Squirt in some Red Cream Hardening agent (so the label tells you the ratio is this or that, but... Just remember "the pinker your Bondo the faster it hardens" ... that's it. A nice Salmon paste color hardens in just under 10 minutes so be quick.)
Mix it fast using your paint scraper. Smoosh it all around and get it mixed up. Pretend it's toxic cake icing.
Use the paint scraper to shove it into the holes.
Try to get it "smooth" ... but don't worry overmuch. You'll be sanding it anyway.
This is what it looks like from the resin side. 
Now let it dry. Leave it the heck alone for like 2 hours or more. Best would be overnight. Bondo is hard on the outside after an hour or two, but chances are very good it's still uncured towards the center.
SandingTools Needed For This Section
- Palm Sander or whatever (you'll need both a "course" 80 or so grit and a "fine" 120-200 or so grit)
- Patience
- a sheet of 400 grit sandpaper
Sanded
So you just sand it. You're going for no major ridges or high spots with the course sandpaper... then switch to the fine and do the rest.
You'll get it close and realize there are gaps and ridges and whatnot that you missed somehow (and you'll be certain you had gotten them all... right up until another gap pops up, like a weed). Like this:
Pinholes/Cracks/Divots 
So... Bondo again. Rinse and repeat.
Eventually you'll get fed up or be happy with the results (or both). If you have it you can switch to 400 grit sandpaper and finish up by hand... use sandpaper on your bare hand so its organic. Any gaps or pits at this point will become battle damage when you paint it so don't stress. If you end up with pinholes you can't seem to get rid of, try some Bondo Glazing Putty and sand again.
Sanding Complete Trim
TrimTools Needed For This Step
Needs a Trim
Now even up the edges to where you're happy with it.
Attach the collar bit and the lames (horizontal belly bits) to the breastplate. You can use whatever pattern you like for those.
Finished product with basecoat Summary
If you've done everything in this guide, you've completed some awesome looking female chest armor, and you've also acquired the following skills:
- Custom pattern and template making
- Cutting and forming sintra
- Fiberglass
- Bondo
- Sanding... so much sanding.
All of these skills will serve you well as you work on the rest of your kit--- you're also ready to go and scratch build a bucket now if you want to, because it's essentially the same skill-set.
--MMCC Education Team--